
SAML Single Sign on with Active Directory - ADFS
- Xibo for Android
- DSDevices DSCS9X/95 Set-up Guide
- Install a White Label or a different Player version on DSDevices
- CEC Screen Power on/off with DSDevices
- Hardware Recommendations
- Philips Signage SoC Monitors
- Sony Bravia SoC
- Hisense Commercial Displays SoC
- Managing Storage on the Android Device
- Player Settings
- Players without an Internet Connection
- Remote Administration with SS Helper
- Restart Rooted Device with a Shell Command
- Running Xibo for Android
- Resolving Common Issues
- Error shown when I try to licence my Player?
- Player not updating from the CMS?
- I can see my Licence entry but the Player appears unlicensed?
- Error message - Player is missing dependencies
- My scheduled Layouts are not working?
- Layout won't play? Splash screen plays?
- Watchdog error message
- Troubleshooting for Administrators
- Audit Trail
- Log Information
- Player Logs
- Getting the Player Status
- Request Player Status via CMS - Logged in Players only
- Request Player Status directly from a Device
- Can I use the Xibo name / logo?
- Can I run a Xibo Player on Raspberry Pi?
- How can I increase the upload file size limit?
- How do Players communicate with the CMS?
- How many displays can Xibo support?
- How do I reset the Xibo_admin account password?
- Power On/Off for Players
- Why do I need a Default Layout?
- Xibo for Android FAQ's
- Gapless Playback
- Autoplaying Embedded Youtube Videos
- Closing to Home screen
- Displaying Images
- Embedded TV
- External SD card not listed when running Banana-Pi
- Helper Command to change Time zone
- HTML5 Video
- Memory Notifications
- Menu not accessible
- SSL Support
- Using Portrait Displays
- Video wont play properly
On this page
SAML Single Sign on with Active Directory - ADFS
Xibo can be setup to authenticate against any SAML 2.0 IdP. Microsoft Active Directory Federation Services can be configured to act as such an IdP.
- Firstly, install the ADFS role on your server.
You will need a valid SSL certificate for the URL you intend to publish your IdP on. In this example, I’m publishing an IdP at https://fs.test.alexharrington.co.uk. This IdP won’t exist by the time this article is published. Similarly, your Xibo CMS will need to be hosted on a server protected by a valid SSL certificate.
Once the IdP is installed, ensure you can access the IdP webpage at the URL you have configured from both your Xibo CMS Server, and from the Client computers that your users will use to authenticate against.
https://fs.test.alexharrington.co.uk/adfs/ls/ should bring up a webpage served by ADFS with an error. That’s normal. We’re just checking connectivity here.

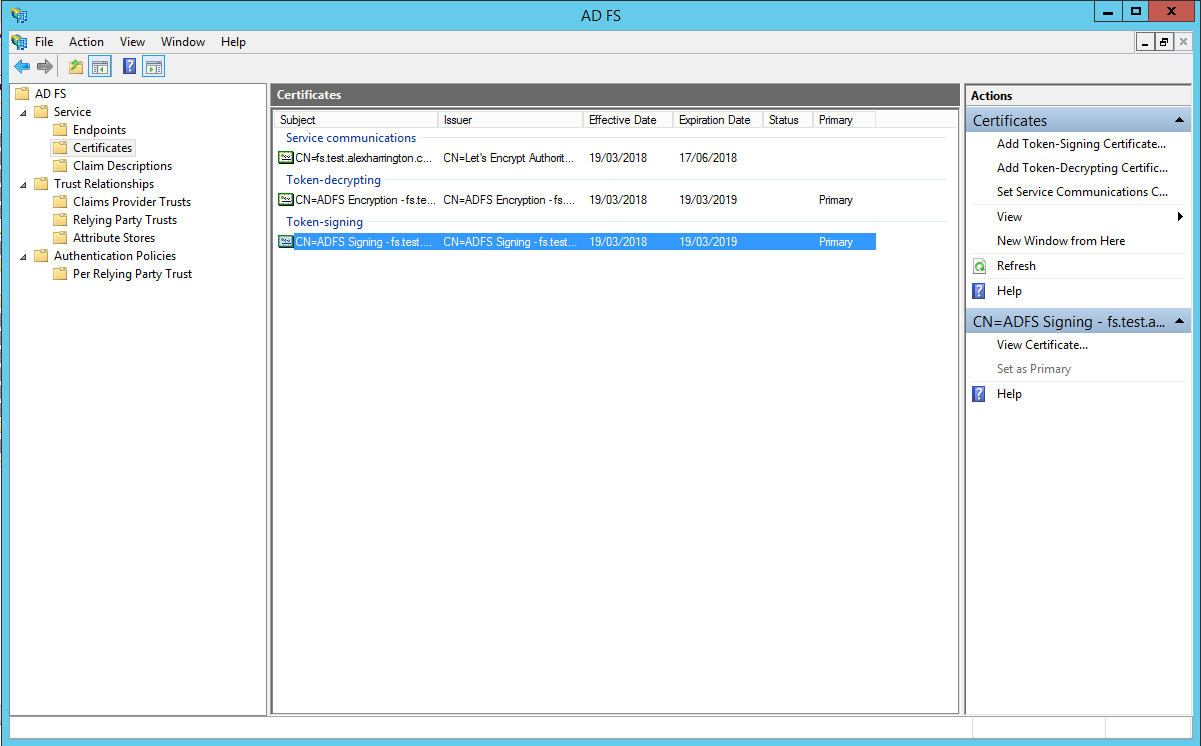
First we need to export the signing certificate from ADFS.
- Open the ADFS console, go to
Service > Certificatesand find theToken-signingcertificate.
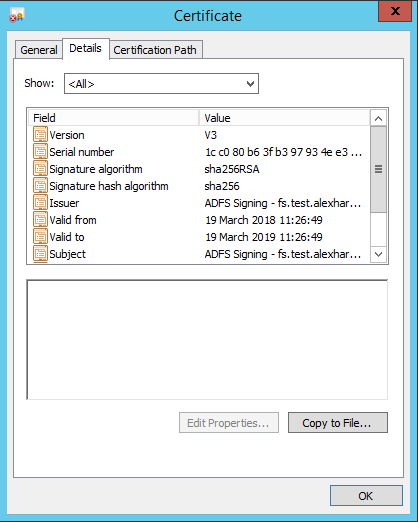
-
Right click on it, and choose
View Certificate. -
Move to the
Detailstab, and clickCopy to File…:
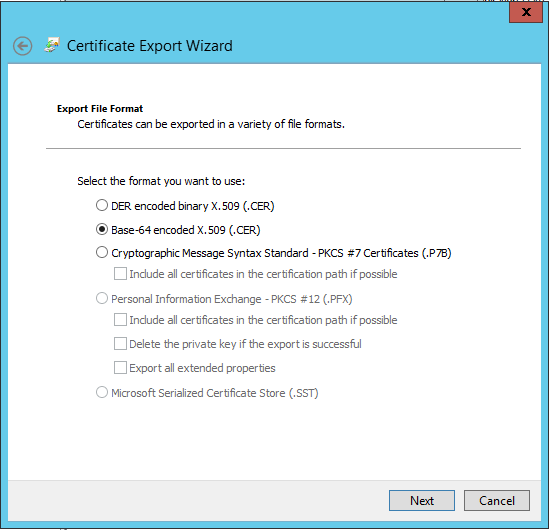
- Choose
Base-64 encoded X.509format, and save the file somewhere convenient:
- Now on your Xibo CMS, edit your
settings.phporsettings-custom.phpfile, and add in the example SAML configuration below:
$authentication = new \Xibo\Middleware\SAMLAuthentication();

$samlSettings = array (
   'workflow' => array(
        // Enable/Disable Just-In-Time provisioning
        'jit' => true,
        // Attribute to identify the user
        'field_to_identify' => 'email',   // Alternatives: UserID, UserName or email
        // Default libraryQuota assigned to the created user by JIT
        'libraryQuota' => 1000,
        // Initial User Group
        'group' => 'Users',
        // Home Page
        'homePage' => 'icondashboard.view',
        // Enable/Disable Single Logout
        'slo' => false,
        // Attribute mapping between XIBO-CMS and the IdP
        'mapping' => array (
            'UserID' => '',
            'usertypeid' => '',
            'UserName' => 'uid',
            'email' => 'mail',
        )
    ),
   // Settings for the PHP-SAML toolkit.
   // See documentation: https://github.com/onelogin/php-saml#settings
   'strict' => false,
   'debug' => true,
   'idp' => array (
            'entityId' => 'https://<yourcms>/saml/acs',
            'singleSignOnService' => array (
                'url' => 'https://<yourIdP>/adfs/ls',
            ),
            'singleLogoutService' => array (
                'url' => 'http://idp.example.com/simplesaml/saml2/idp/SingleLogoutService.php',
            ),
            'x509cert' => '<yourCert>',
        ),
   'sp' => array (
        'entityId' => 'https://<yourCMS>/saml/acs',
        'assertionConsumerService' => array (
            'url' => 'https://<yourCMS>/saml/acs',
        ),
        'singleLogoutService' => array (
            'url' => 'https://<yourCMS>/saml/sls',
        ),
        'NameIDFormat' => 'urn:oasis:names:tc:SAML:1.1:nameid-format:emailAddress',
        'x509cert' => '',
        'privateKey' > '',
    ),
    'security' => array (
        'nameIdEncrypted' => false,
        'authnRequestsSigned' => false,
        'logoutRequestSigned' => false,
        'logoutResponseSigned' => false,
        'signMetadata' => false,
        'wantMessagesSigned' => false,
        'wantAssertionsSigned' => false,
        'wantAssertionsEncrypted' => false,
        'wantNameIdEncrypted' => false,
    )
);
Be sure to replace:
-
<yourIdP>with the URL of your ADFS server -
<yourCMS>with the URL of your Xibo CMS -
<yourCert>with the text contents of the certificate you exported from ADFS, all on one line, excluding the-----BEGIN CERTIFICATE-----and-----END CERTIFICATE-----lines
homePage => icondashboard.view needs to be replaced if you are using a CMS earlier than v3.x:
- Earlier than v3.x - replace
icondashboard.viewwithicondashboard - Earlier than v2.0.3 - replace
icondashboard.viewwithdashboard
Save the file, and now your CMS will redirect to your SAML IdP when you go to login.
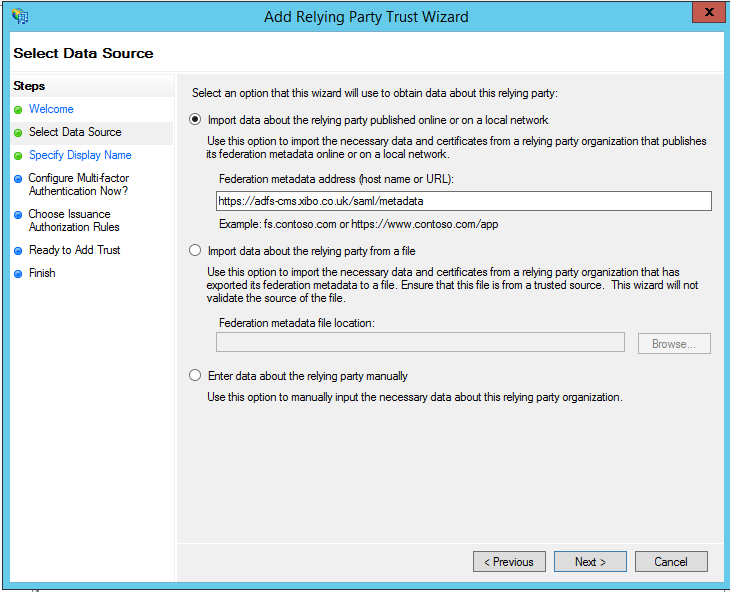
-
Back in the ADFS console, go to
Trust Relationships -> Relaying Party Trusts -
Select
Add Relaying Party Trustto start the Wizard. -
At the
Select Data Sourcestep, enter the SAML metadata URL for your CMS - so for examplehttps://<yourCMS/saml/metadata
There are various advanced options presented, most of which are out of the scope of this guide. Please select the options you require. In my case, I choose I do not want to configure multi-factor authentication settings for this relaying party trust at this time and Permit all users to access this relaying party when prompted.
Finally a summary is presented:
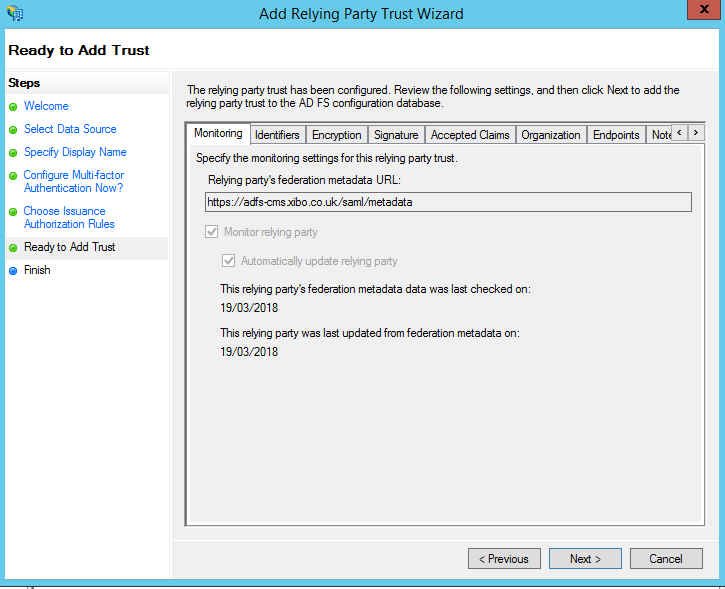
Leave the box ticked to Edit Claim Rules and finish the wizard.
We need to add three claim rules.
- Click
Add Rule, and chooseSend Claims Using a Custom Rule:
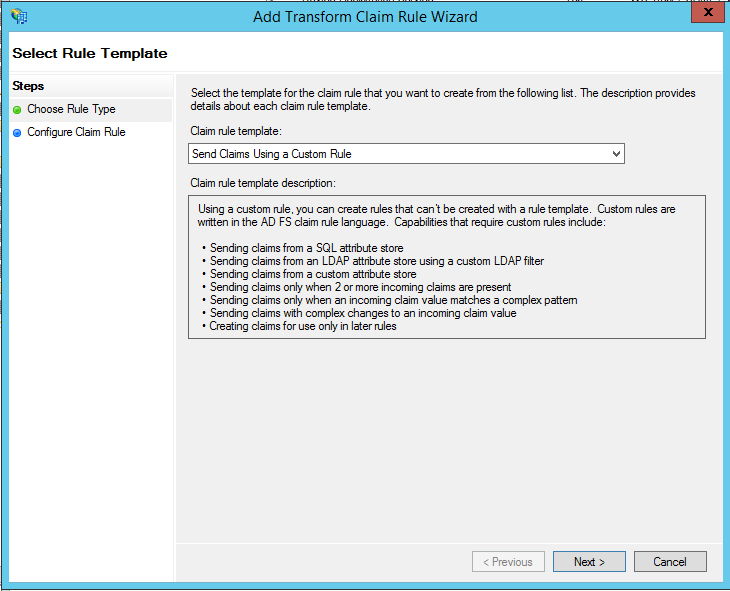
- Name the rule
Create Persistent Identifier 1, and enter the following custom rule:
c:[Type == "http://schemas.microsoft.com/ws/2008/06/identity/claims/windowsaccountname"]
 => add(store = "_OpaqueIdStore", types = ("http://xibo/internal/persistentId"), query = "{0};{1};{2}", param = "ppid", param = c.Value, param = c.OriginalIssuer);
- Add a second rule, and choose the type
Transform an Incoming Claim. Call this ruleCreate Persistent Identifier 2, and configure as follows:

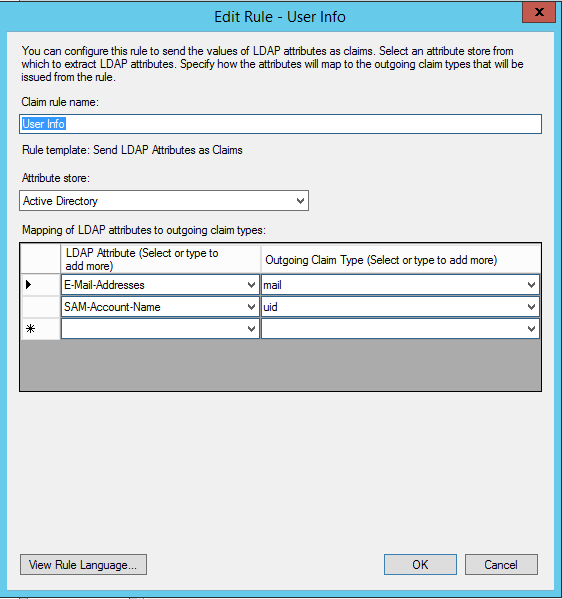
- Finally add a third rule, of type
Send LDAP Attributes as Claims. Name itUser Info, and set it up as follows:
You should now be able to log in to your Xibo CMS as any user inside Active Directory.
