
Xibo Audience Reporting Connector
- Xibo for Android
- DSDevices DSCS9X/95 Set-up Guide
- Install a White Label or a different Player version on DSDevices
- CEC Screen Power on/off with DSDevices
- Hardware Recommendations
- Philips Signage SoC Monitors
- Sony Bravia SoC
- Hisense Commercial Displays SoC
- Managing Storage on the Android Device
- Player Settings
- Players without an Internet Connection
- Remote Administration with SS Helper
- Restart Rooted Device with a Shell Command
- Running Xibo for Android
- Resolving Common Issues
- Error shown when I try to licence my Player?
- Player not updating from the CMS?
- I can see my Licence entry but the Player appears unlicensed?
- Error message - Player is missing dependencies
- My scheduled Layouts are not working?
- Layout won't play? Splash screen plays?
- Watchdog error message
- Troubleshooting for Administrators
- Audit Trail
- Log Information
- Player Logs
- Getting the Player Status
- Request Player Status via CMS - Logged in Players only
- Request Player Status directly from a Device
- Can I use the Xibo name / logo?
- Can I run a Xibo Player on Raspberry Pi?
- How can I increase the upload file size limit?
- How do Players communicate with the CMS?
- How many displays can Xibo support?
- How do I reset the Xibo_admin account password?
- Power On/Off for Players
- Why do I need a Default Layout?
- Xibo for Android FAQ's
- Gapless Playback
- Autoplaying Embedded Youtube Videos
- Closing to Home screen
- Displaying Images
- Embedded TV
- External SD card not listed when running Banana-Pi
- Helper Command to change Time zone
- HTML5 Video
- Memory Notifications
- Menu not accessible
- SSL Support
- Using Portrait Displays
- Video wont play properly
On this page
Xibo Audience Reporting Connector
The Xibo Audience Reporting Connector is an add-on service from Xibo Signage which gives enhanced reporting capabilities which include audience data, impressions, and map views of mobile proof of play as well as the ability to add DMAs (Designated Market Areas) to apply to active Ad Campaigns.

Once purchased, an API key will be made available in the Connectors section of My Account. This key is required to configure the Xibo Audience Reporting Connector in the Xibo CMS.
Configure Audience Reporting Connector
From the CMS:
- Click on Applications under the Administration section of the main menu.
- Scroll down to the Connectors section of the page.
- Click the Configure button for the Xibo Audience Reporting Connector.
- Enter the API Key available in My Account after purchase.

-
Tick to Enable and initiate the Xibo Audience Reporting Connector service.
-
Click to Save.
Add DMA
The Xibo Audience Reporting Connector allows for the creation of a DMA (Designated Market Area) to define a time period or location where you can adjust Cost per Play/Impressions per Play to apply to any Plays for active Ad Campaigns which occur within the set time frame or area.
- Click on the Configure button for the Xibo Audience Reporting Connector.
- Select the Add DMA button at the top of the form:
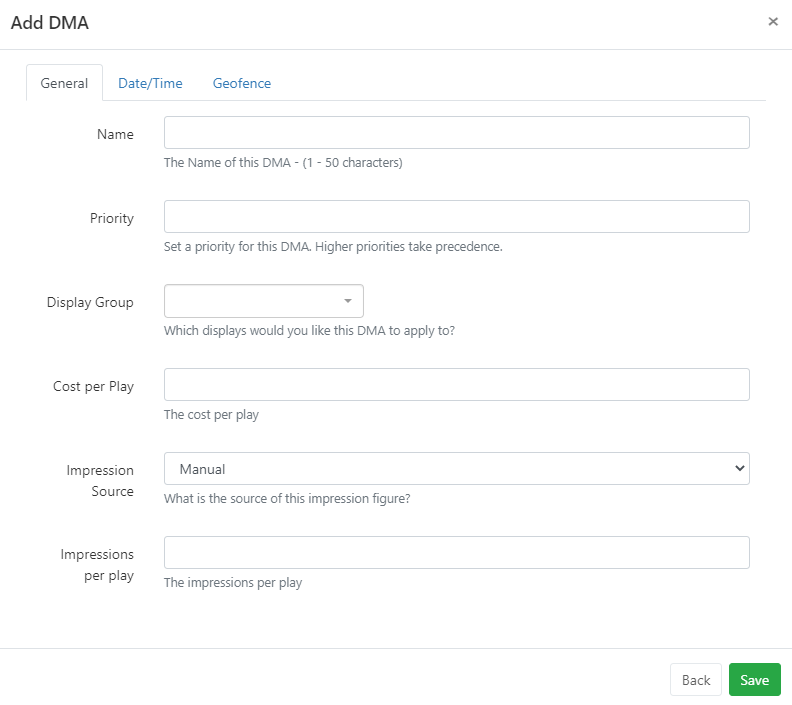
- Give the DMA an identifiable Name to be used in the CMS.
- Set a Priority to tell the Connector which DMA should take precedence when multiple DMAs may apply. (The higher the number the higher the priority).
- Use the drop down menu to select the Display Group to apply the DMA to or leave blank to apply to all Displays.
- Next set a Cost per Play/Impressions per Play to apply to this DMA to differ from the Cost per Play/Impressions per Play set on the Display itself.
Select the Date/Time Tab:
- Set an overall Start and End Date or leave blank for this DMA to always be active.
- Click to set Days of the Week for this DMA to be active.
- Select Start and End Times or leave blank to be always active.
For mobile displays:
- Select the Geofence tab to draw areas on the map to restrict the DMA to be active only in the set geofenced areas.
- Click to Save the configuration.
Reports
Additional Reports are available from All Reports under the Reporting section of the main CMS menu.
Scroll down the page to view available Connector Reports:

