
Sony Bravia SoC
- Xibo for Android
- DSDevices DSCS9X/95 Set-up Guide
- Install a White Label or a different Player version on DSDevices
- CEC Screen Power on/off with DSDevices
- Hardware Recommendations
- Philips Signage SoC Monitors
- Sony Bravia SoC
- Hisense Commercial Displays SoC
- Managing Storage on the Android Device
- Player Settings
- Players without an Internet Connection
- Remote Administration with SS Helper
- Restart Rooted Device with a Shell Command
- Running Xibo for Android
- Resolving Common Issues
- Error shown when I try to licence my Player?
- Player not updating from the CMS?
- I can see my Licence entry but the Player appears unlicensed?
- Error message - Player is missing dependencies
- My scheduled Layouts are not working?
- Layout won't play? Splash screen plays?
- Watchdog error message
- Troubleshooting for Administrators
- Audit Trail
- Log Information
- Player Logs
- Getting the Player Status
- Request Player Status via CMS - Logged in Players only
- Request Player Status directly from a Device
- Can I use the Xibo name / logo?
- Can I run a Xibo Player on Raspberry Pi?
- How can I increase the upload file size limit?
- How do Players communicate with the CMS?
- How many displays can Xibo support?
- How do I reset the Xibo_admin account password?
- Power On/Off for Players
- Why do I need a Default Layout?
- Xibo for Android FAQ's
- Gapless Playback
- Autoplaying Embedded Youtube Videos
- Closing to Home screen
- Displaying Images
- Embedded TV
- External SD card not listed when running Banana-Pi
- Helper Command to change Time zone
- HTML5 Video
- Memory Notifications
- Menu not accessible
- SSL Support
- Using Portrait Displays
- Video wont play properly
On this page
Sony Bravia SoC
Xibo has partnered with Sony to offer Remote Device Management (RDM) with Zero Touch Provisioning (ZTP) on selected BRAVIA Professional Display series models, as listed below:
- BZ30L
- BZ35L
- BZ40L
- BZ53L
Provisioning is via a “zero-touch” code displayed during the display’s initial boot and will automatically apply Xibo’s recommended Pro Settings , install the Xibo Application and Configure to start automatically once powered on. This functionality is available on the above supported display series models for networks running with either a Cloud or a Self-hosted CMS.
Configuration
BRAVIA Professional Displays connected via Zero Touch Provisioning (ZTP) will automatically be enrolled in Remote Device Management (RDM) . Product lines not mentioned above may still work with Xibo, see the “Models not under Remote Device Management” section below.
Register
- Log into My Account
- From the Hardware page, scroll down to the Remote Management device table, under hardware purchases and click the Register Sony Bravia button to open the following form:
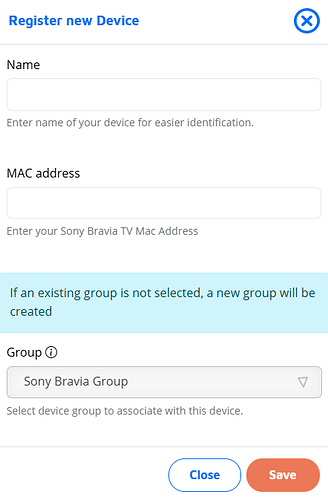
- Enter a friendly Name for your device and the ethernet MAC address.
You can find the ethernet mac address labelled on the back of the screen, or via “Settings > Networking and Internet >Network Status”.
Make sure your screen is connected via ethernet and you supply the ethernet/wired MAC address using - instead of : as the seperator, e.g. 00-00-00-00-00-00.
-
Select a Group to use for the device. If you have no Groups or do not select a Group, one will be created by default.
-
Click Save to close the form.
Your device will be registered to your Xibo account and will be shown in the Remote Management table:

If you haven’t ever turned on the device, you can install it now, and turn it on. If you’ve already switched the device on previously, you will first need to do a factory reset: To factory reset, go to: “Settings >System >About >Reset”.
- The screen will boot/reboot and show a provisioning code; this will be a 6 digit number.
After rebooting, the screen may show a list of languages to choose from; do not make a selection. Wait for the provisioning code to appear.
- Locate your device in the table and click View Details.
- Enter the code shown on your device here and click Submit.

The screen will start provisioning and will enter “Pro Mode” once it has completed.
- Xibo for Android will open automatically so that you can connect to your CMS using the code displayed on screen, or manually entering your CMS credentials.
Once the provisioning process has completed, you will see the Status change to “Activated”:

Manage Groups
Groups can be viewed / edited and added by clicking the Manage Groups button.
When creating a new Group with an associated White Label build, ensure that the correct one is selected as it cannot be changed once saved.
Controlling the TV
Click on View Details to access options to control the TV as well as view device details, current status and renaming options:
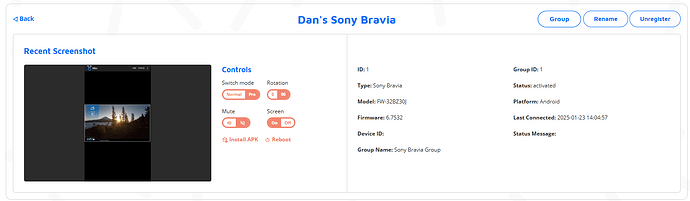
Install APK
Install a new version (on release) and use to rebuild a White Label APK. If you are using the latest APK/White Label build this option will not available for your device.
Swap APK
This option is available for devices which belong to device groups assigned with a different APK to that of the device. Swap APK will uninstall the APK from the device and install the APK/White Label build APK as set to the device group.
Group
Clicking the Group button allows a user to change the device group for a registered device. Changing a Group will uninstall the current APK being used on the device and install the APK which has been set for the Group.
Unregister Device
Click Unregister to remove the device from your Xibo account.
NOTE: Clicking Unregister will delete the device details from the Xibo database as well as remove it completely from Sony records.
Models not under Remote Device Management
Sony BRAVIA Professional Displays which run Android but not compatible with RDM, are still capable of running Xibo in a Landscape orientation.
Install
Side load Xibo
- Download the latest Xibo for Android player APK from the website downloads section and copy it to the root folder of a USB stick.
- Enter Pro Settings Mode and plug in the USB stick.
- Navigate to Pro Settings >Install API and select the APK on your USB stick. [Source]
You can open Xibo while in pro settings mode and connect to your CMS using the Android Player Installation guide. If you miss opening Xibo during the install process, please enable in Pro Mode first (as shown below) and then start Pro Mode .
- Xibo will appear in “Apps” when in Pro Mode and can be opened from there.
Enable in Pro Mode
Navigate to Pro Settings > Apps select for Xibo to be enabled in Pro mode. [Source].
Power ON/OFF/Restart
Xibo supports Power ON/OFF and Restart via a combination of options you can enable in Pro Settings.
Power control by apps
Navigate to Pro Settings → Developer and turn on “Power state control by apps”. [Source]
Simple IP control
In Pro Settings Mode, navigate to Settings > Network and Internet > Remote device settings > Control remotely > Enable.
TV modes
BRAVIA Professional Displays have 3 modes:
- Normal
- Pro
- Pro Settings
We recommend running all signage installations in Pro mode.
All configuration should be done in Pro Settings mode.
Enter Pro Settings mode
Using your remote control, press the following 4 buttons one at a time in sequence:
- i+
- mute
- vol+
- home
Wait a few seconds and your TV will restart into Pro Settings Mode.
Known limitations
There are a number of limitations to consider before choosing to run Xibo with Sony Bravia SoC as listed in this section.
Portrait orientation
Portrait orientation is only available on devices under RDM and must be selected using “My Account”.
The following CMS changes are also required:
The following CMS changes are also required: You should create a dedicated Display Settings Profile for your Bravia inside the CMS.
When running in Portrait orientation the following settings need to be configured:
- Use a SurfaceView for Video Rendering? = Off
- Orientation: Device Default
- Video Engine: ExoPlayer
- Use Multiple Video Decoders: Off
The Android TV user interface will not be rotated.
Gapless video playback
In order to play one video after another without a black frame between them it is necessary for the device to be able to decode more than one video at the same time. This is not currently possible on Sony Bravia.
Video In
Xibo supports Video In on the Sony Bravia using our core Widget. If you are using HDMI make sure you choose the first port.
Remote upgrade
Xibo application upgrades should be done via “My Account”. This functionality will soon be available via the CMS.
Resolution
When using a 4k panel, the user interface elements, images and web content are displayed in 1080p and upscaled to 4k. Video content is run natively in 4k.
Xibo will show the Display resolution as 1920x1080 in the Display Management page.
